Are you new to blogging, mama?
I’m sure you read a lot of mom blogs, go on Facebook, and hang out on Pinterest when your little one is sleeping.
You see everyone online with their blog, and you want to know how to start a blog. You want to join this awesome community. I can’t blame you.
I’ve been blogging for two years on this blog and let me tell you, starting a mom blog was the best decision I ever made.
I love blogging so much, and that’s probably why three years ago I decided to become a freelance writer. I blog for a living, and it’s been the best decision I made for my family and me.
You know why? My family has been sick. We’ve all had the flu, stomach flu, icky colds, low-grade fevers and more for over a month! Because I have a blog, I can take care of my twins at home every day, and not have to worry about going back to work, hiring a babysitter or taking them to day care.
I can stay home, make an online income and take care of my twins. Do you want that mama? I know you do.
You can make money on your blog as long as you’re willing to put in the time and effort to grow your blog. If you’re not sure if you can, just look at these bloggers who started out just like you and grew their blog to thousands a month!
- Abby from Just A Girl and Her Blog – $40,124 in one month
- Rosemarie from The Busy Budgeter – $32,469 in one month
- Lena from What Mommy Does – $9,997 in one month
- Jenn Snyder of Women Winning Online – $2,419 in one month
I’ve had so many moms email me personally telling me their story for wanting to start a blog, but they had no idea what to do or where to go.
If you want to start a mom blog, don’t worry, it’s easy, quick and you don’t need to know any tech stuff. Trust me. I’m tech illiterate, and I was able to start a blog with SiteGround in under 10 minutes!
Okay.
Let’s break this down and start from the beginning!
1. Figure Out Your Niche

One thing you need to think about when starting your blog is what you plan to write about. This can be a challenge for a lot of people. I struggled too.
When I first started Twins Mommy, I decided to write for work-at-home moms with little ones. But, this soon turned to mom bloggers who wanted to become mompreneurs. And even now, I’m honing my niche to make sure I focus on traffic growth, income growth, and email list growth. I will, of course, talk about my twins and being productive, but it’s not my blog’s focus.
You might be wondering, why do I even need a niche? There’s a lot of lifestyle blogs that talk about career, travel, beauty, parenting and DIY.
For your first blog, though, I suggest you find a niche. You know why? It will help you grow your blog and your following quicker.
People will remember you when they can think of your whole blog and what you stand for.
So, to find your niche, ask these questions:
What am I passionate about?
What’s that one thing that keeps you up at night? Look at your hobbies and find out what you enjoy and can write about it for a long time.
You can also look at previous experience to help you decide your niche. My background is in education and being a mama, but my online experience is in digital marketing. When I created Twins Mommy I drew from those experiences.
Is there a need for my niche?
This is a little bit more challenging. How do you find out if there’s a need when, on Pinterest, you see like a gazillion blogs that talk about the same thing? One easy way is to check on Facebook. Go to a few groups you belong to and use their search function.
Just type in your niche or keyword that represents your blog and see if there are lots of questions surrounding that topic. If so, you have a viable niche!
Can you monetize it?
Listen, we all love blogging for fun, but if you really want to stay home with your little one or be able to quit that 9-5 job you hate, you need to find a way to monetize your niche. For some, that’s doing sponsored posts, for others, it’s affiliate marketing, and for others, it’s starting a service (like me!).
Answer those three questions, and that should help you find your niche.
2. Choose a Blogging Platform
This site is a WordPress.org blog and while there are other blogging platforms to choose from – SquareSpace for example – for the sake of this tutorial, I’ll walk you through how to start a WordPress.org blog.
A WordPress.org blog requires hosting and this post walks you through how to set up your hosting using SiteGround.
I recommend starting a blog with WordPress because:
- Most sites are WordPress sites (like The New Yorker and even Beyoncé!)
- You have more options to customize your site with WordPress plugins and thousands of themes to choose from (both free and paid) to make your blog look the way you want it to.
- There is a lot of support to help you with your WordPress blog. There are YouTube videos, blog posts and WordPress forums – not to mention me! – that can help you with your blog’s theme and site.
3. Choose a Domain Name
This is the fun part, mamas! This is where your creativity comes out of the bag and can play  It’s time to create your website’s name. What are you going to name your blog? This will be what you type in the address bar – http://yourblogname.com.
It’s probably a good idea to have your niche somewhere in your website name.
But, if you take a look at my blog’s name – Twins Mommy – this doesn’t scream helping moms become mompreneurs!
So, don’t spend days thinking of the perfect name. Make sure, though, to have a couple of names in case the .com is already taken. I also suggest trying to get a .com since that’s the most common and easy to remember ( just make a list for now. Once we get into starting a mom blog, I’ll show you how to get your domain name!).
As a rule, make sure your domain name is simple, short and easy to spell, and relates to your overall brand.
Some of my favorite mom blog names are:
Kids, Cash, Chaos
Crazy Life With Littles
Living For Naptime
Okay! Now it’s time to create a blog.
4. Time to Start a Blog with SiteGround and WordPress
When I first started Twins Mommy I wanted to try a secure and reliable web host and SiteGround is one of the best hosting companies out there and a great value too, mamas!
I had no problems with them even when my blog traffic started growing a lot, which is great because I don’t want my site to be slow.
Why Choose SiteGround?
There’s a lot of other hosts to choose from, so why choose SiteGround to host your blog? There are three main reasons why I started my mom blog with SiteGround.
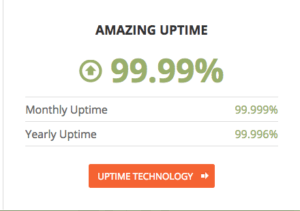
1. Their Uptime is 99.99% – That’s Amazing!
 It sucks for bloggers when their blog goes down.
I mean, you’re missing potential subscribers, readers and customers. Yikes! But, with SiteGround, they have an incredible uptime – 99.99%.
In fact, over the past year, SiteGround’s 99.996% uptime means they’ve only been down for about 20 minutes total! Let’s just say this is an amazing feat that many other hosts can’t even compete with.
Your blog won’t be down when you need it up the most, mamas!
2. They Have 24/7 Support For All of Your Questions
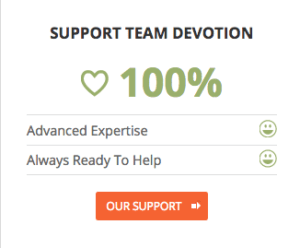 If you have a problem or question, you don’t have to wait over an hour for a representative. SiteGround’s fantastic tech support will answer your questions any time of the day or night, and do it quickly.
You can choose to phone or chat online with their tech support team. Since their support team is available 24/7 you have access to their support team all the time.
If you’re a mom, I suggest the chat option in case your little one wants to test our their lungs
3. SiteGround is Equipped with SuperCacher – The Uber Best Thing for Bloggers
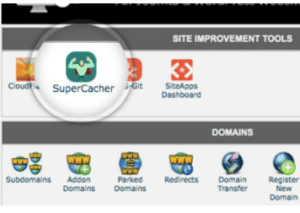 Your blog will get traffic mama! Don’t think that it won’t. Whether it’s 5 people a day or 500 people a day or even 5, 000 people a day (crossing fingers!!!), SiteGround’s SuperCacher can handle a viral pin or a boost in your traffic.
According to SiteGround, your site can be:
- 4x faster – your blog will have hyperspeed power mamas!
- Be able to “handle up to 100 times more hits” – with SiteGround’s SuperCacher, your site is cached so it can serve more visitors. I know, it’s getting all geeky up in here, but just think FASTER website.
- Improved – with SiteGround and their improved site tools, you’re site will just be better equipped for a better user experience.
Note: SuperCacher is available on the GrowBig plan and higher (which I highly recommend)!
So, you see, starting your blog using SiteGround for your hosting has a lot of great features for you, mama! Psst…there’s something else that I love about SiteGround, but I have to wait a bit until I tell you about it!
Okay. Are you ready to get started? Follow this quick tutorial and you can get your blog up and running in 10 minutes! And for moms, that’s the perfect time before you have to get back into mom-mode.
Before we begin, the best way to follow this tutorial is to also do it with me! So click over to SiteGround right now and follow along!
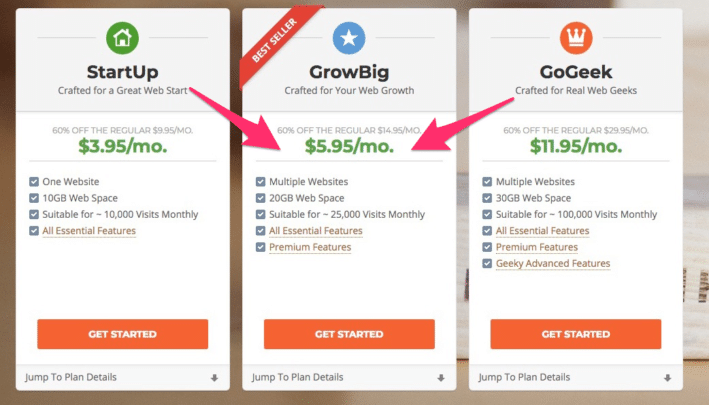
Step 1: Choose Your Plan
SiteGround has three plans to choose from: StartUp, GrowBig and GoGeek. The most basic plan is the StartUp, but the plan I recommend bloggers running WordPress start with is GrowBig.
If you use my special link, you will save 60% off the regular price!
**when you’re on SiteGround’s plan page, hover over the highlighted links and you can see exactly what the features are for each plan***
If you want the best performance for your WordPress site – or if you think you’re going to have more than one website (which you eventually will…making new sites is sooooo addicting) – choose the GrowBig plan with included SuperCacher. This is the plan I use, and it’s also very budget-friendly – starting at $5.95 a month!
It comes with more space and resources, as well as premium features like the SuperCacher I talked about earlier. (Can you tell I love the SuperCacher? Be honest mamas, don’t you just hate slow websites?!)
If you’re a brand new blogger and you just want to get your new blog up and running, the StartUp plan starts at only $3.95/month.
This plan is great for you if you’re bootstrapping your online biz and need to keep expenses down!
Finally, if you want to get your geek on, the high-performance GoGeek plan is $11.95/month to start. If you’ve already got an existing high-traffic site, if you’re a developer who loves advanced features or if you’re running an eCommerce site that demands PCI compliance, you’ll get top-of-the-line performance and support with the GoGeek plan.
When it comes to support, SiteGround is known for their insanely fast, and insanely helpful support – but the GrowBig and GoGeek plans come with even more priority support…something to keep in mind for the novice blogger.
Many people don’t think of this, but you can lock in the special discounted pricing for longer than one year. Yup, that’s right mamas. Choose the 2-year or the 3-year term for big savings up front. And bonus points…you won’t have to worry about a hosting bill for another 2 (or 3) years!
Click on the Order Now button for any of the plans. This will take you to step 2.
Step 2: Choose Your Domain Name
Remember the list you made of potential website names? Your domain name is what people will remember you by when they are on Pinterest or Facebook.
It’s also what will set your brand apart from others. So, when someone thinks of your site’s name, it should represent your brand. As I stated already, Twins Mommy isn’t such a great domain name since I changed my niche and decided to talk more about business than twins. But, I am still building a brand with Twins Mommy. People “know” me for my strategies to grow a blog.
When you get to this page, you can use your existing domain name or pick a new domain name.
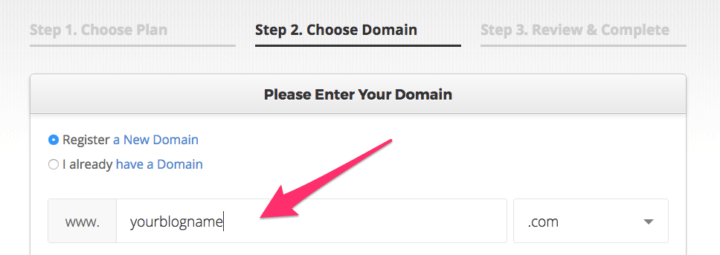
Type in your website’s name, and it will check if it’s available. You can pick your domain extension like .com, .org, .net, but I highly suggest you stick with .com since it’s easier to brand and remember.
If your website name is available, you can move on to step 3.
Step 3: Your Account Info
Fill out your account and client information.
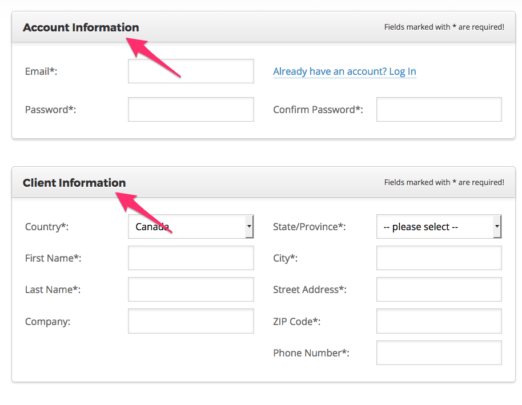
Next, fill out your payment and purchase information (make sure you pick the 12 month period (or longer) in order to get the 60% discount for the whole year).
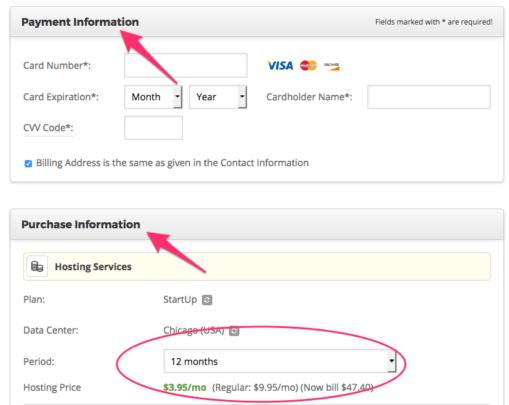
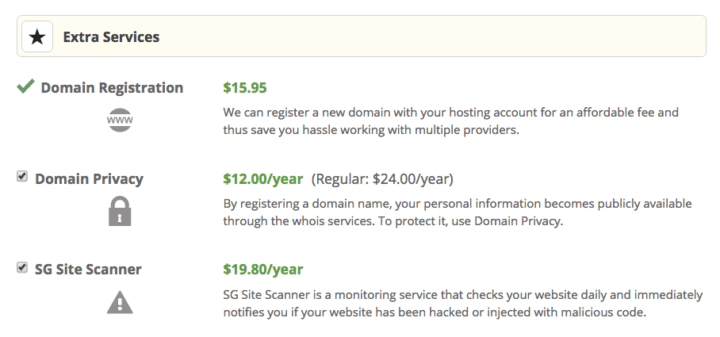
At the bottom are a couple of Extra Services that you can choose to keep or not – they’re pretty self-explanatory so if you don’t need them, you’ll save a few dollars! At the bottom is your total for a year’s worth of hosting.
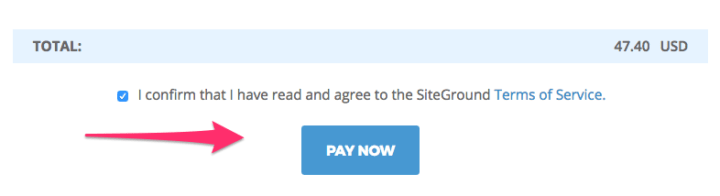
Below the title, make sure you click the box that you agree to the terms of service and then click Pay Now.
Congrats mama! You now have hosting for your blog! Easy-peasy right? Now you just need to install WordPress and start getting creative with those color palettes and designs for your new blog.
But wait, remember when I told you there was one more awesome feature that I like about SiteGround? Well, if you’re a total wreck when it comes to tech (like me) then the tech team at SiteGround can set it up for you! Wha-what? Yes.
All you need to do is go to “live chat” and talk to a SiteGround representative. Ask them if they can set up your WordPress site and send over your login details…that’s it! In about 15 minutes you’ll have access you new blog mama!

Install WordPress
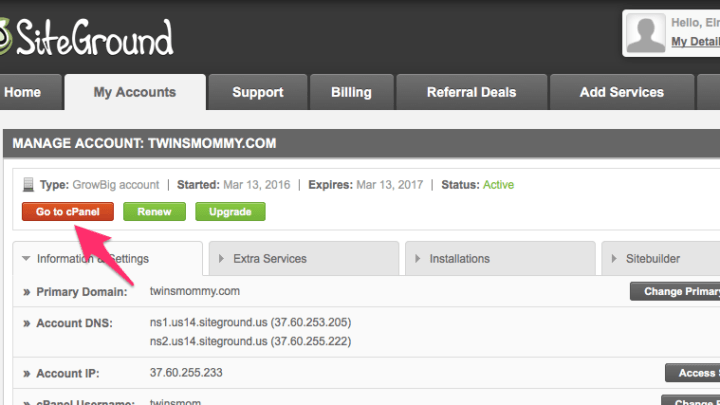
If you want to configure WordPress yourself, you can totally do it – it’s easy too!
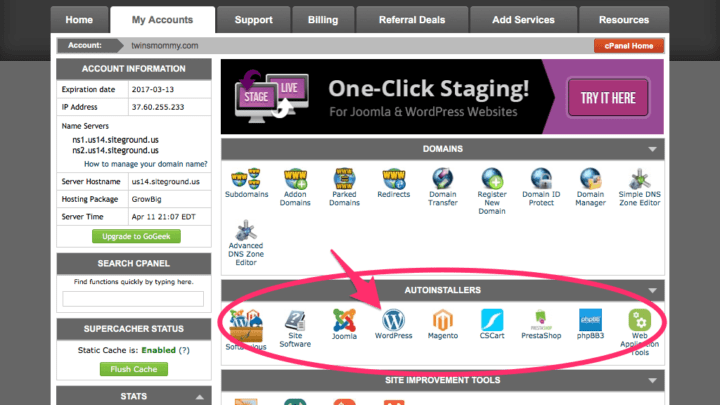
First, got to the My Accounts tab and click on Go to cPanel.
Next, click on WordPress in the Autoinstallers section.
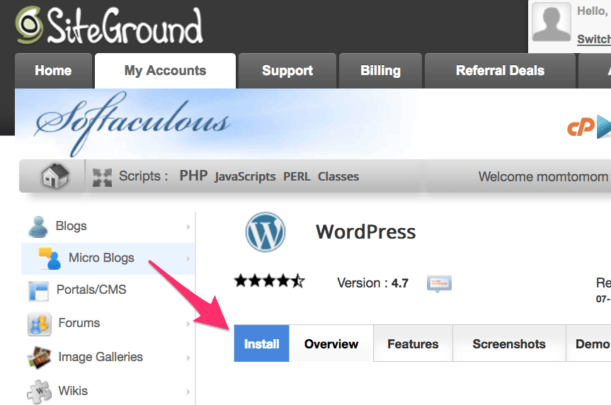
Click on the blue Install button.
After install, fill in the information in the next screen.
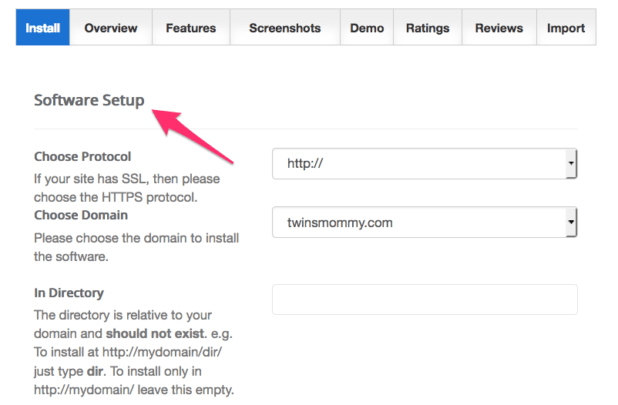
- Choose Protocol – generally keep it the same – http://
- Choose Domain – choose your domain name from the choices in the drop-down menu – but, most likely the first choice you see is the one you want.
- In Directory – unless you know you want this, leave it blank.
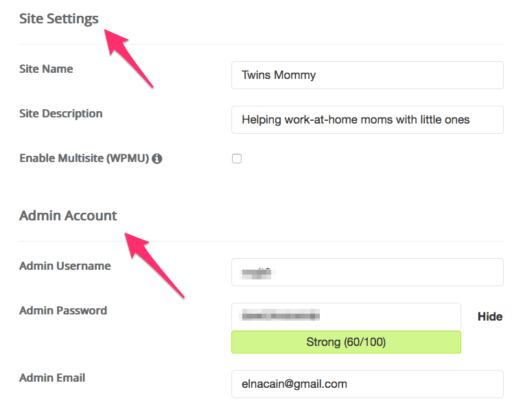
- Site Name – This is the name of your site you picked out earlier. You can change this later.
- Site Description – A brief description of what your site is about, or you can leave this blank. Again, you can change this later.
- Admin Username – This will be the name you use to log into your WordPress blog (or you can always use email address here)
- Admin Password – This is the password to access your WordPress backend (your blog’s dashboard). Choose a strong, but easy-to-remember, password.
- Admin email – Enter your email address
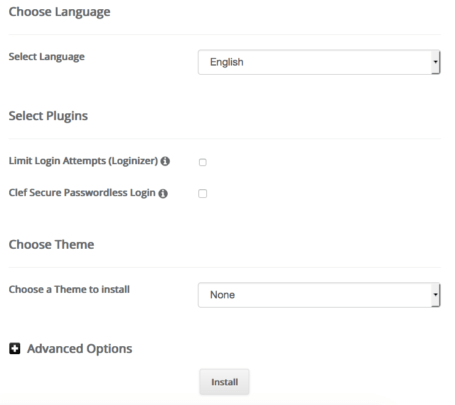
- Choose Theme – While you can install your theme right in SiteGround, I suggest not installing any theme until you’re in the backend of your WordPress blog. There are many free themes to choose from so you can find one that will fit your brand easily!
Click Install and there ya go!
You did it, mama! Now, you can log in with your username (or email) and password!

Boom! You Have a Mom Blog!
Are you excited? I know when I started my blog I had about a million topics to write about!! ha..well not that much. But, I was excited and rearing to start publishing posts.
Now what?
Here are some posts in my Blogging Basics series that might help you:
- Blogging Basics: Why Every Blogger Needs a Gravatar (And How to Set One Up)
- Blogging Basics: The Best Types of Posts to Have on Your New Blog
- Blogging Basics: How to Write a Blog Post That Gets a Ton of Comments
I want to hear from you!
When you set up your blog tell me about it and make sure to give me your link! Email me or leave a comment or find me on Facebook or Twitter!